Main Window and Workflow
OpenShot Video Editor has one main window, which may have a slightly different appearance on each operating system.
Main Window
Overview
Red lines have been added to indicate the important areas of the window.
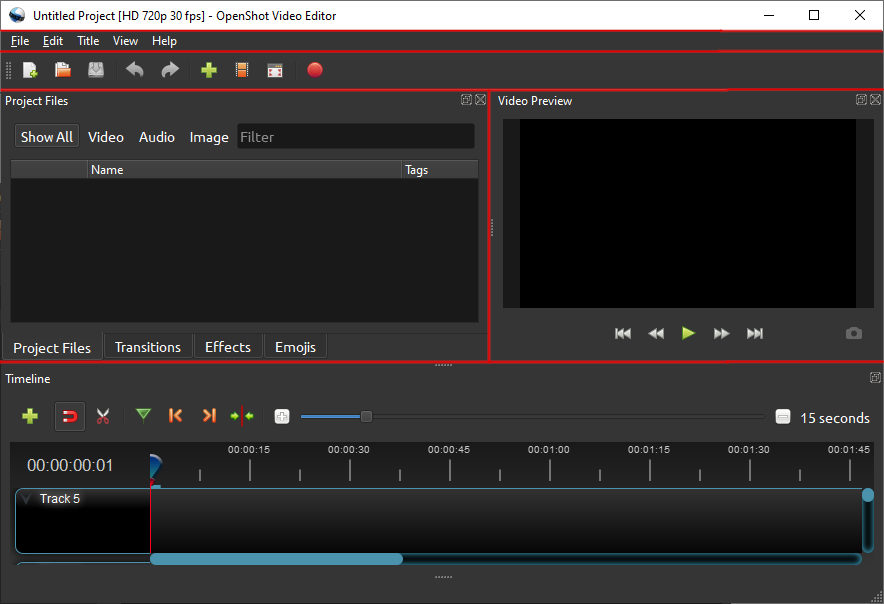
The Main Menu  is at the top, with some important functions such as opening and saving projects.
The Toolbar  is below the Main Menu. Hover over an icon in OpenShot to discover its function.
A multi-purpose panel sits below the Toolbar on the left. This panel can display Project Files, Transitions, Effects or Emojis. The contents are selected by clicking on the tabs at the bottom.
The Video Preview panel is to the right. Your video displays here during playback.
The Timeline is at the bottom. This is where you add and can see the components of your video.
The Properties panel is not currently shown, but will appear when needed.
Layout
OpenShot allows great flexibility in the layout of the main window.
You can close a panel that you are not using, by clicking its close icon
 .
.You can drag and drop panels to another location in the window.
You can detach a panel to become a floating independent window by clicking the icon
 to the left of the close icon.
Drag and drop to re-attach it to the main window (it’s quite easy to do this unintentionally - take care).
to the left of the close icon.
Drag and drop to re-attach it to the main window (it’s quite easy to do this unintentionally - take care).From the Main Menu, View→Views allows you to reset the layout to Simple View and Advanced View. This is useful to return the main window to a standard condition.
From the Main Menu, View→Docks allows you to choose which panels are visible.
OpenShot will remember your layout.
Workflow
Beginning with OpenShot
The Quick Tutorial provides a very helpful step by step introduction to the basic usage of OpenShot.

Also when you first launch OpenShot you will be presented with a friendly built-in tutorial, covering the basics. Clicking Next will jump to the next topic. You can always view this tutorial again from Help→Tutorial on the Main Menu.
The main sections of the User Guide are laid out in an order you might use when creating a video - you will wish to read these. To give an overview, your workflow when starting out might be:
1. Import Media Files
Import the video, image and sound files that you intend to use to make your video, by dragging them into the Project Files panel, or by clicking the Import icon (plus sign) on the Toolbar. OpenShot can work with most video, image and sound files.
2. Set a Profile
Set a Profile for your project. The profile sets the size and other aspects of your final video. It is best to choose a profile at the start of your project.
3. Clips on the Timeline
Place project files as clips on the Timeline. OpenShot uses tracks to layer videos and images. The top most track is the top layer, and the bottom track is the bottom layer. If you are familiar with layers in a photo editing application, then you should be quite familiar with this concept. OpenShot will mix each layer together, just like a photo editing application. A clip on a higher track (layer) will obscure any clip on a track below. You can have an unlimited number of tracks, but typically a video project will not need more than 10 (or so) tracks.
4. Edit
As described in the Clips section, you can move clips on the Timeline, and can set smooth transitions between them, and can apply various effects to them (such as to adjust the brightness or to add bars at the sides). Using clip properties allows you to adjust a clip’s size and position on screen, and many other things.
The OpenShot Animation system allows you to vary property values over time, enabling some amazing effects.
While you edit, you will frequently view your video in the Preview panel.
5. Text and Emojis
OpenShot can create project files containing high quality text/titles, using a number of provided templates. These are available from the Main Menu under Titles, and are described in the Titles section. You can choose static or animated text templates.
You can of course also import your own image files with titles and text, perhaps created externally with InkScape, Gimp or Blender.
OpenShot also provides a subset of SVG images from the OpenMoji library. These graphics are licensed for use under the Creative Commons Share Alike License 4.0, which appears to require you to provide attribution (give appropriate credit, provide a link to the license) if you use them. You can drag the images you choose to the Project Files panel or directly to the Timeline, and then use them like any other image. Note that you may need Emojis and Project Files open in separate panels.
There are other image libraries and resources on the internet that do not require attribution.
Keyboard Shortcuts
You can use keyboard shortcuts to speed up your work, as listed in the Keyboard Shortcuts Appendix.