Project Files
Before we can begin making a video, we need to import files into OpenShot. Most media file types (videos, images, audio) are recognized. Files can be viewed and managed in the Project Files panel.
Import Files
To import files into the Project Files panel, your options are:
Right click in the Project Files panel, and choose Import Files…
From the Main Menu choose File menu→Import Files…
Click the Import Files… toolbar button

Drag and drop the files from your file manager (file explorer, finder, etc…)

If you import an image with a name ending with a number (for example image01.png), OpenShot will open a dialog to ask you if you wish to import an “image sequence”. On some operating systems the dialog may be hidden by another window, and everything appears frozen. This is because the software libraries work best only with the Linux operating system. If you can click on the main OpenShot window you’ll hopefully then see the dialog, and if you don’t understand, just respond No.
The facilty to import and use **Image Sequences** is covered below.
Project Files Menu

Right click in the Project Files panel to view the project files menu. Here are the options:
Import Files… :Open a dialog to import files into your project.
Thumbnail/Detail : Toggle the view in the Project Files panel between Details (stacked vertically, with full file name and tag if any) and Thumbnails (stacked more closely with fewer details).
Preview File : Preview a video file in a new floating window (best not used with images, due to crashes).
Split Clip… : Select extracts from an existing project file, adding them to the project files list. See below.
Edit Title : Edit an existing title file (a static title created in OpenShot).
Duplicate Title : Make a copy of an existing (static) title file, which can then be edited.
Add to Timeline : Add one or many files to the Timeline in one step. See below.
File Properties : View the properties of a file, such as frame rate, size, etc…
Remove from Project : Remove a file (and any of its clips on the timeline) from the project.
Split Clip Dialog
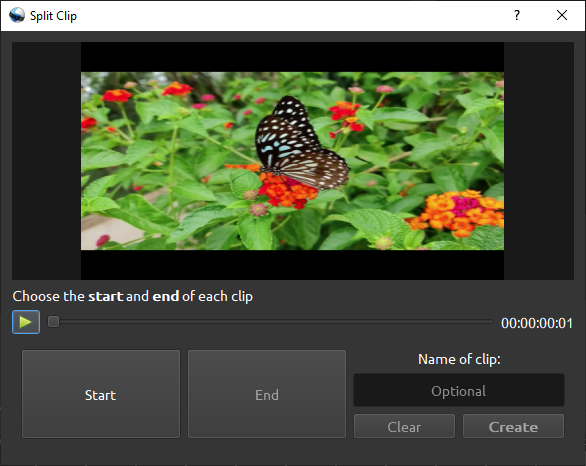
The Split Clip dialog allows you to select extracts from an existing project video file, and save them as separate new project files. Right click on the project file, and choose Split Clip… from the menu.
Click the Play icon to play the video. The slider marks the play position, and can be dragged with the mouse. For fine control, use the keyboard left and right arrow keys to move a frame at a time. The figures to the right of the slider tell you the exact play position, in hours:minutes:seconds:frames (for example if your profile has 25 frames per second, then the frames figure ranges from 1 to 25, then back to 1.)
Click on the Start button to save a starting position, then choose an end position and click the End button. If you make a mistake, the Clear button resets both Start and End.
You’ll find it helpful to give your extract a name so you can recognise it - though this is optional.
Finally, click the Create button to add your extract to the project files list.
The dialog remains open, so that you can create further extracts if you wish.
Add to Timeline
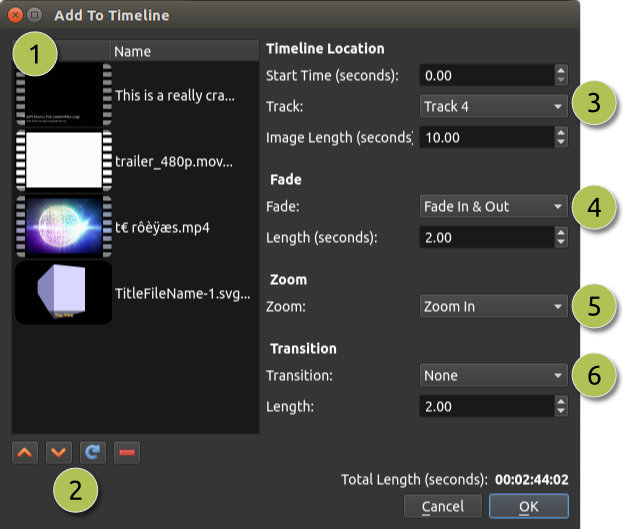
In certain cases, you might need to add many files to the timeline at the same time. For example, a photo slide show, or a large number of short video clips. The Add to Timeline dialog can automate this task for you. First, select all files you need to add, then right click and choose Add to Timeline.
# |
Name |
Description |
|---|---|---|
1 |
Selected Files |
The list of selected files that need to be added to the timeline |
2 |
Order of Files |
Use these buttons to reorder the list of files (move up, move down, randomize, remove) |
3 |
Timeline Position |
Choose the starting position and track where these files need to be inserted on the timeline |
4 |
Fade Options |
Fade in, fade out, both, or none |
5 |
Zoom Options |
Zoom in, zoom out, or none |
6 |
Transitions |
Choose a specific transition to use between files, random, or none |
Properties
To view the properties of any imported file in your video project, right click on the file, and choose File Properties. This will launch the file properties dialog, which displays information about your media file. For certain types of images (i.e. image sequences), you can adjust the frame rate on this dialog also.

# |
Name |
Description |
|---|---|---|
1 |
File Properties |
Select an image sequence in the Project Files panel, right click and choose File Properties |
2 |
Frame Rate |
For image sequences, you can also adjust the frame rate of the animation |
Image sequences
OpenShot can import a sequence of images as one item in the project files list, which can be added to the timeline and played as an animation.
Image names must be in a format like somename01.png, somename02.png, somename03.png … where the numbers are sequential, with a consistent number of digits. So AnotherName0001.png, AnotherName0002.png, AnotherName0003.png … also works.
When you import a single image file ending with a number, OpenShot asks you if you would like to import as an image sequence. On some operating systems, windows appear to lock up and the cursor goes to a wait state (this is due to some internal software being meant primarily for the Linux operating system). If this happens, try to activate/click on the OpenShot window, and respond to the dialog.
Obviously many of the numbered images that you import will not be part of a sequence, but there is unfortunately no way to modify the behaviour.

If you do wish to import an image sequence, just import any single image, and respond to the dialog. If you select all images and drag them in to the Project Files panel, the first image becomes an image sequence, and rest are imported as single image files.
Once imported, the image sequence appears in the Project Files panel similarly to a video, with a name resembling “somename%02d.png”.
somename - the original name before the numbering
%02d - programmers’ jargon for “exactly 2 digits” - there’s no need to understand this
.png - the original extension / file type
Right click on the image sequence to choose File Properties:
set a frame rate (per second) at which to play the sequence under Video Details
choose a Start Frame and End Frame under Frame Settings, if you don’t want all frames to play.
OpenShot’s animated Titles are image sequences. The (external, open source) Blender program can also generate image sequences.
You may notice, particularly with short sequences, that some of the images are never processed - this issue is under investigation.
Titles and Text
OpenShot can generate high quality titles and text, as explained in the **Titles** section.
The files generated appear in the Project Files panel.