Clip Presets Menu

Right clicking on a clip brings up the Preset Menu, which gives you an easy way to apply preset animations such as fading, sliding, zooming, etc., and to access other useful functions.
You can also show the Preset Menu by clicking the arrow  in the top left corner of the clip.
This page has the details about each menu option.
It’s worth noting that the purpose of the Preset Menu is to make it easy to apply an option just once. If you change your mind, it can become more complex to achieve what you want.
For example it is very easy to apply a fast Fade In, but if you then change your mind and want a slow Fade In instead, things get more difficult.
You may also find some of the outcomes unexpected - for example Animate → No Animation does not remove all animation, only the animation for 2 properties.
Copy
Copy a clip, or the clip’s effects or key frames to a clipboard.
Clip : copy an entire clip (with all key frames). This will also copy multiple clips
Effects : copy all the clip’s effects and their keyframes
Keyframes : copy all the clip’s property keyframes (but not effects keyframes)
Paste
The Paste option will appear if there is something that can be pasted.
For clips, Paste will appear when you right click in an empty area of track. If selected, the clip will be pasted started at that point. You can also use the keyboard shortcut, usually Ctrl-V, to paste at the play-head on the same track as the copied track.
For effects, Paste will appear when you right click on another clip. If selected, all copied effects and their keyframes will be pasted. The keyboard shortcut does not paste effects.
For keyframes, Paste will appear when you right click on another clip. If selected, the copied keyframes will be pasted. The keyboard shortcut does not paste keyframes.
Align
This option will appear if multiple clips are selected. The clips with be aligned, so that their Left or Right edges coincide, at the furthest left or furthest right edge of all the selected clips.
Fade
Fade a clip in or out (visual) (often easier than using a transition). This sets appropriate Alpha keyframes. Options are:
No Fade : this removes all Alpha keyframes from the clip. Note that if you have set an active Fade type (eg Fade In (Fast)), then changing to another type (eg Fade In (Slow)) does not remove the previously set keyframes. It’s therefore best to apply No Fade before changing Fade types.
Start of Clip
Fade In (Fast) : fades in over 1 second
Fade In (Slow) : fades in over 3 seconds
End of Clip
Fade Out (Fast) : fades out over 1 second
Fade Out (Slow) : fades out over 3 seconds
Entire Clip
Fade In and Out(Fast) : fades in over 1 second at the start, and out over 1 second at the end
Fade In and Out(Slow) : fades in over 3 seconds at the start, and out over 3 seconds at the end
Fade In (Entire Clip) : fades in over entire duration of the clip
Fade Out (Entire Clip) : fades out over entire duration of the clip
Animate
Zoom and slide a clip
No Animation : removes all keyframes for Scale X, Scale Y, Location X and Location Y only. All other keyframes and properties are unaffected.
Start of Clip : zooms or slides the clip over its first 1 second:
Zoom
Zoom In → 50% to 100%, 75% to 100%, 100% to 150% : zooms (scales the clip) over the first 1 second, by setting appropriate Scale X and Scale Y keyframes.
Zoom Out → 100% to 75%, 100% to 50%, 150% to 100% : zooms (scales the clip) over the first 1 second, by setting appropriate Scale X and Scale Y keyframes.
Centre to Edge → Centre to Top, Left, Right, Bottom : moves the clip, over the first 1 second, from the centre of the screen in the appropriate direction, until the clip is off the screen. Location X and Location Y keyframes are set to achieve this.
Edge to Centre → Top, Left, Right, Bottom to Centre : moves the clip, over the first 1 second, to the centre of the screen in the appropriate direction, from the clip being off the screen. Location X and Location Y keyframes are set to achieve this.
Edge to Edge → Top to Bottom, Left to Right, Right to Left, Bottom to Top : moves the clip, over the first 1 second, from one edge to the other, in the appropriate direction, with the clip being off screen at both edges. Location X and Location Y keyframes are set to achieve this.
Random : sets the clip to a random position with a random scaling at the start of the clip, and moves it to another random position with another random scaling over the first 1 second.
End of Clip : zooms or slides the clip over its final 1 second. Properties set by this function will also be animated from their previous keyframe, or the start of the clip, as well as over the final 1 second. For example, if you set Zoom In → 50% to 100%, with Scale X and Scale Y not previously set, then Scale X and Scale Y will animate from 100% at the start to 50% at 1 second before the end, and then animate back to 100% over the final second.
Zoom
Zoom In → 50% to 100%, 75% to 100%, 100% to 150% : zooms (scales the clip) over the final 1 second, by setting appropriate Scale X and Scale Y keyframes.
Zoom Out → 100% to 75%, 100% to 50%, 150% to 100% : zooms (scales the clip) over the final 1 second, by setting appropriate Scale X and Scale Y keyframes.
Centre to Edge → Centre to Top, Left, Right, Bottom : moves the clip, over the final 1 second, from the centre of the screen in the appropriate direction, until the clip is off the screen. Location X and Location Y keyframes are set to achieve this.
Edge to Centre → Top, Left, Right, Bottom to Centre : moves the clip, over the final 1 second, to the centre of the screen in the appropriate direction, from the clip being off the screen. Location X and Location Y keyframes are set to achieve this.
Edge to Edge → Top to Bottom, Left to Right, Right to Left, Bottom to Top : moves the clip, over the final 1 second, from one edge to the other, in the appropriate direction, with the clip being off screen at both edges. Location X and Location Y keyframes are set to achieve this.
Random : sets the clip to a random position with a random scaling at 1 second from the end of the clip, and moves it to another random position with another random scaling over the final 1 second.
Entire Clip : zooms or slides the clip over its entire duration:
Zoom
Zoom In → 50% to 100%, 75% to 100%, 100% to 150% : zooms (scales the clip) over its duration, by setting appropriate Scale X and Scale Y keyframes.
Zoom Out → 100% to 75%, 100% to 50%, 150% to 100% : zooms (scales the clip) over its duration, by setting appropriate Scale X and Scale Y keyframes.
Centre to Edge → Centre to Top, Left, Right, Bottom : moves the clip, over its duration, from the centre of the screen in the appropriate direction, until the clip is off the screen. Location X and Location Y keyframes are set to achieve this.
Edge to Centre → Top, Left, Right, Bottom to Centre : moves the clip, over its duration, to the centre of the screen in the appropriate direction, from the clip being off the screen. Location X and Location Y keyframes are set to achieve this.
Edge to Edge → Top to Bottom, Left to Right, Right to Left, Bottom to Top : moves the clip, over its duration, from one edge to the other, in the appropriate direction, with the clip being off screen at both edges. Location X and Location Y keyframes are set to achieve this.
Random : sets the clip to a random position with a random scaling at the start of the clip, and moves it to another random position with another random scaling at the end of the clip.
Rotate
Rotate or flips a video. Options are:
No Rotation
Rotate 90 (Right) : a quarter turn clockwise.
Rotate 90 (Left) : a quarter turn anticlockwise.
Rotate 180 (Flip) : a half turn.
To flip a clip by reflection, use a negative value for Scale X or Scale Y properties.
Layout
Set the size and position for a video or multiple videos on screen.
Reset Layout : sets Scale to Best Fit, Scale X and Scale Y to 1 and centres the clip.
1/4 Size - Centre : sets Scale to Best Fit, Scale X and Scale Y to 0.5 and centres the clip.
1/4 Size - Top Left : sets Scale to Best Fit, Scale X and Scale Y to 0.5 and positions the top left corner of the clip at top left of the screen.
1/4 Size - Top Right : sets Scale to Best Fit, Scale X and Scale Y to 0.5 and positions the top right corner of the clip at top right of the screen.
1/4 Size - Bottom Left : sets Scale to Best Fit, Scale X and Scale Y to 0.5 and positions the bottom left corner of the clip at bottom left of the screen.
1/4 Size - Bottom Right : sets Scale to Best Fit, Scale X and Scale Y to 0.5 and positions the bottom right corner of the clip at bottom right of the screen.
Show All (Maintain Ratio) : places all clips into an evenly spaced grid, and in theory should display them to Best Fit in their place in the grid, ie without changing aspect ratio. Currently this doesn’t work correctly.
Show All (Distort) : places all clips into an evenly spaced grid, and adjusts their aspect ratio so that they fit onto the grid. There is no option to choose the grid. This is best used with clips all starting at the same time. The behaviour is complex otherwise.
Time
Reverse and speed up or slow down video. If the video has a change of speed, OpenShot tries to change the audio speed as well. However the resulting audio is likely to be severely affectd by distorion.
Reset Time : removes Time keyframes, and resets the End property to its original value, even if it has been set to another value previously..
Normal
Forward → x1 uses End value
Backward → x1
Fast
Forward → x2, x4, x8, x16 uses previous End value…
Backward → x2, x4, x8, x16
Slow
Forward → x1/2, 1/4, 1/8, 1/16
Backward → x1/2, 1/4, 1/8, 1/16
Freeze → 2, 4, 6, 8, 10, 20, 30 seconds : pauses/freezes the video at the current play-head position for the chosen amount of time, then resumes. The End property is increased by the chosen amount of time, which increases the clip’s duration. Time keyframes are set at the play-head position and where play resumes. Audio is muted during the pause, by setting Volume keyframes. It seems that only one pause/freeze can be set on the clip. Applying Reset Time restores the End value and removes the Time keyframes; however it does not remove the Volume keyframes. You can use Volume→Reset Volume to do this.
Freeze and Zoom → 2, 4, 6, 8, 10, 20, 30 seconds** : pauses/freezes the video at the current play-head position for the chosen amount of time, then resumes. During the pause, zooms in by 5% and then zooms out again (by setting Scale X and Scale Y keyframes.) The End property is increased by the chosen amount of time, which increases the clip’s duration. Time keyframes are set at the play-head position and where play resumes. Audio is muted during the pause, by setting Volume keyframes. Applying Reset Time restores the End value and removes the Time keyframes; however it does not remove the Volume, Scale X and Scale Y keyframes. You can use Volume→Reset Volume to remove the Volume keyframes, and Animate→No Animation to remove Scale X and Scale Y keyframes.
Volume
Fade the volume of a clip in or out. This sets appropriate Volume keyframes. Options are:
Reset Volume : this removes all Volume keyframes from the clip, leaving Volume set to 1. Note that if you have set an active Volume Fade type, then changing to another type does not remove the previously set keyframes. It’s therefore often best to apply Reset Volume before changing Fade types.
Start of Clip
Fade In (Fast) : fades volume in over 1 second
Fade In (Slow) : fades volume in over 3 seconds
Level 100% - Level 0% : sets the volume level appropriately at the start of the clip.
End of Clip
Fade Out (Fast) : fades volume out over 1 second
Fade Out (Slow) : fades volume out over 3 seconds
Level 100% - Level 0% : sets the volume level appropriately at the end of the clip. The volume will change gradually from the value at the start to the value at the end.
Entire Clip
Fade In and Out(Fast) : fades volume in over 1 second at the start, and out over 1 second at the end
Fade In and Out(Slow) : fades volume in over 3 seconds at the start, and out over 3 seconds at the end
Fade In (Entire Clip) : fades volume in over entire duration of the clip
Fade Out (Entire Clip) : fades volume out over entire duration of the clip
Level 100% - Level 0% : sets the volume level appropriately at the start of the clip only. However this does not affect any other previously set Volume keyframes - if these exist this setting will not apply to the entire clip.
Separate Audio
Create a separate clip for each audio track. Currently this function appears not to work correctly: only one audio clip is created (even if there are multiple audio tracks available). The single clip overlays anything on the track below. The audio of the source clip appears unaffected - ie it is still also part of the source clip.
Single Clip (all channels) : creates a clip on the track below with a copy of the clip’s audio. The original clip is unaffected.
Multiple Clips (each channel) : appears not to work correctly; functions as Single Clip (all channels). Tested with an mp4 from https://www2.iis.fraunhofer.de/AAC/multichannel.html
Slice
Cut the clip at the play-head position.
Keep Both Sides : the clip is cut into two; both sides are kept, with keyframes in the same positions on the timeline as before.
Keep Left Side : the clip is cut into two; the right side is disgarded. Keyframes in the retained clip are in the same positions on the timeline as before.
Keep Right Side : the clip is cut into two; the left side is disgarded. Keyframes in the retained clip are in the same positions on the timeline as before.
Slice All
This option is only available by right clicking the top of the play-head when it intersects two or more clips. It is therefore not strictly part of the Preset Menu The Slice action (above) is carried out on all the clips which are intersected by the play-head.
Transform
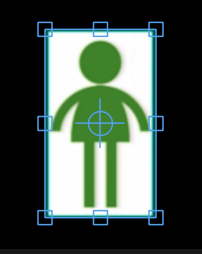
Provides a visual way to resize, move, shear and rotate the clip. A temporary blue-coloured frame appears around the clip, with handles that can be dragged.. The cursor changes to show you what action will happen.
Dragging the small square boxes on the sides resizes the clip.
Dragging the sides shears the clip.
Dragging outside the clip rotates it.
Dragging the circle/crosshairs moves the origin (the centre of rotation and axis for shearing).
This tool adjusts and mirrors the clip’s properties. For example, dragging the origin adjusts Origin X and Origin Y properties.
Display
Display (on the clip on the timeline) either a waveform representing the clip’s audio or an image thumbnail.
Properties
Show the properties panel for a clip. You can check that properties for the correct clip are shown in the Selection box at the top of the Properties panel. When a clip is selected, the standard keyboard shortcut to display its properties is Ctrl-I.
Remove Clip
Remove the clip from the timeline. The original file in the Project Files panel is unaffected.